Tuesday, 13 November 2012

It's here :-)

Spent a very pleasant day at Jeremy's picking up the chassis and associated bits. I also managed a quick blast in the demo car which was great as I'd never even sat in a Sylva J15 before.

It was a long drive up from Southampton, but a friend of mine (and fellow kit car enthusiast) came up with me and shared the driving. Also a big thank you to Jeremy's wife Stella who did a fantastic job ensuring our cups of tea never ran (she also does an awesome beans on toast). I also thought the dogs name was fantastic..........'Lola'.

First off......the colour.....I'll be honest and say I was terrified about this. The colour I wanted was gulf powder blue, but this was not possible, so Jeremy recommended French blue. He sent me a sample, but I could not really get a good feel for what it would end up like so, at risk, I agreed. Turns out I had nothing to worry about, the colour (IMHO) was fantastic, and I think will look great with either an Orange or Black stripe when finished.


I took up the Puma engine so we could get an engine mount welded up in situ. Of interest, the Puma engine has a different mount to the standard sigma / Zetec Se engine. This is down to the variable cam shaft gubbins needing more space behind the cam belt cover.


Anyway, engine went in, mount was welded up, and we left the engine in situ for the journey home.

Now, my plan was to get the chassis powder coated asap...But now the car is home and the engine is still in situ, it makes sense to do some of the installation work before I powder coat and panel the chassis. To start with, and ease me into the process, I'm tackling the gear linkage.

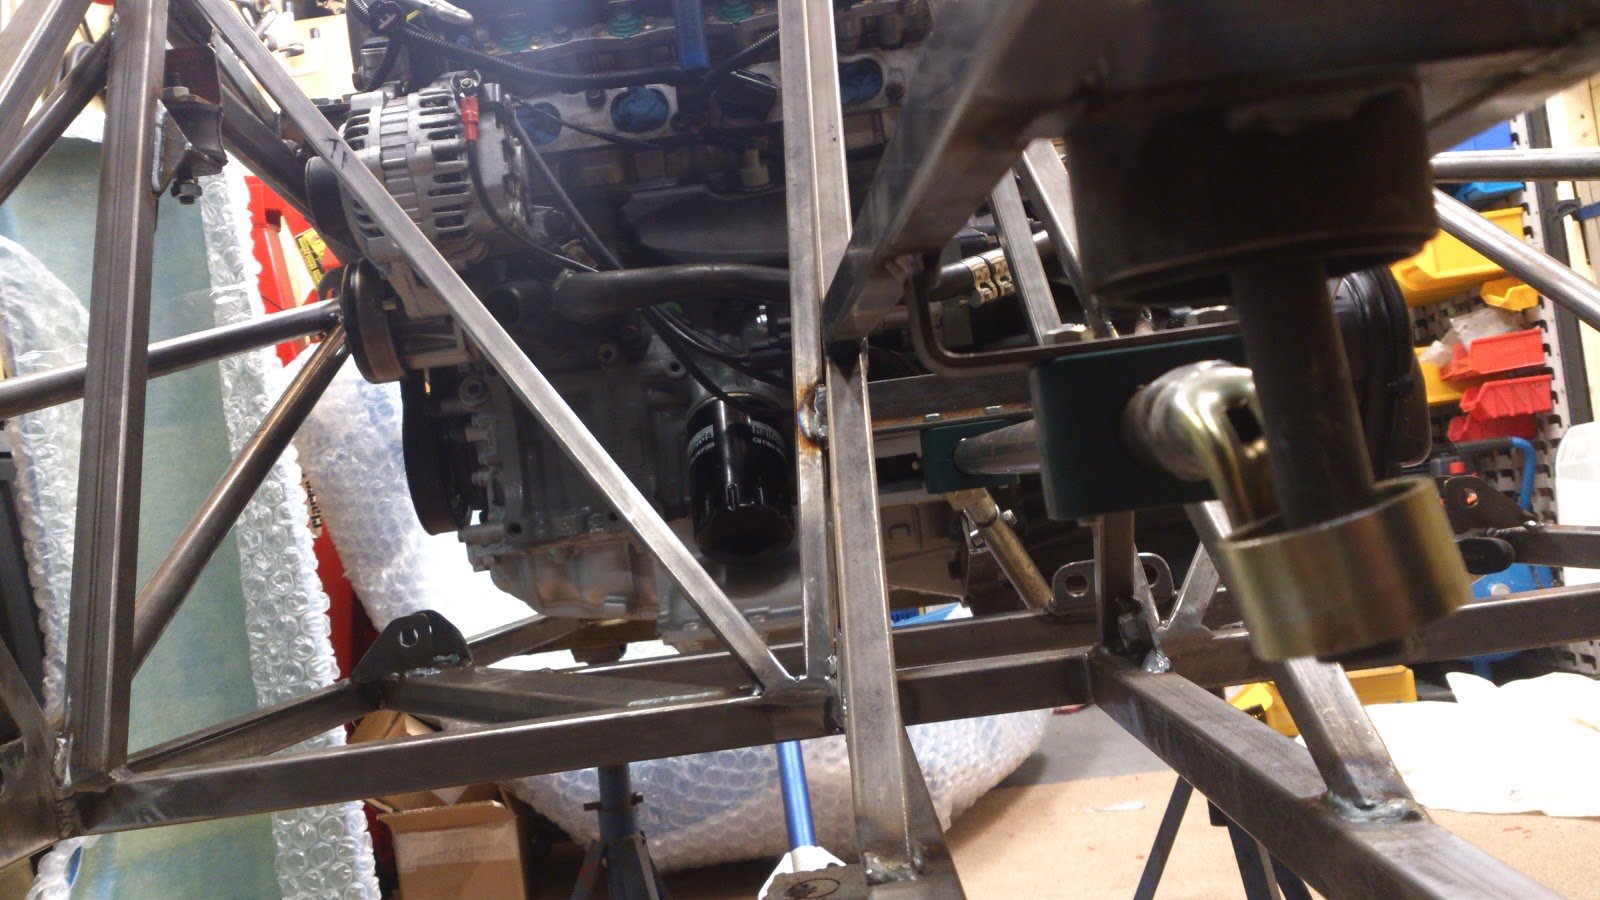
I'm sure I've mentioned it before, but the mechanical linkage found on the older Fiestas and the Puma really is very good, and to maintain this, Sylva developed a system for keeping it. The J15 and the Riot use a curved bar that comes back under the gear box and is connected to the selector shaft. Then, by using linkages from the Donor car you can maintain a decent quality shift.

I've taken a few pics of how this works, and hope this will help future builders as I could not picture it when I was reading the manual:



Wednesday, 7 November 2012

Dressed

As the kit is arriving on the 10th Nov 2012, I decided to get as much as I could finished on the engine. New clutch installed, gearbox mated, new starter motor and most of the engine loom completed and ready to plug in.

You may also notice the carpet in the garage!....Should be nice and cosy for the winter!.


Friday, 2 November 2012

Manifold DONE!!!!!....Yippiee.

Finally, after what seems like an age, the manifold is finished. And Jolly pleased with it I am too :-)

Was it worth all the hassle...Questionable!

I'll give it a polish before going on the car:
Pick up next weekend of the main kit.....How exciting :-)


Monday, 29 October 2012

What a tart I am......Check out these beauties that arrived today....Colour coded to the car. How about that for some totally unecessary spending!..I paid extra for the colour....But......They do look very nice. Also purchased EBC Greenstuff pads for them.


Saturday, 27 October 2012

Curse the day I decided to make the inlet manifold!!!

Seriously, if you ever think about making an inlet manifold which has massively convoluted angles......DON'T!

I should have bought a weber dcoe manifold and spaced the throttle bodies....you live and learn, but I'm too far down the road now to be beaten.....as you can see the two flanges are finished and I'm almost there with the first tube.....ended up bolting the two together to get the distance and spacing. But my hands are covered in blisters from trying to file them down...ouch!.


Although I always vowed to keep this blog about the car, we had some good news about our youngest who is now 2 and a half yrs old...he had reconstructive surgery on his trachea 6 weeks ago at gosh, and another trip up this week has confirmed all seems well...we are hoping we are on the home run now to getting his tracheostomy out which might mean he can make some noise. He's a real trooper who just plods on and gets on with life....inspirational really, watching these young kids coping with life's ups and downs.

Saturday now, and although the wife doesn't know it yet, the main loom is going to be slithering into the house tonight like a giant python, and will park itself on the lounge floor where the buzzing out and stripping starts.....can't beat that for a sat night can you?


Thursday, 18 October 2012

Fuel pump, inlet manifold and wiring

I spent some time dismantling the fuel pump bracket last night. The pump itself looks very small, but obviously up to the job. For the build, you use the existing bracket but it needs lengthening to the pump reaches the bottom of the fuel tank. The fuel tank is deep thin rather than shallow and long (as it is in the Puma), and sits in front of the bulkhead in the passenger footwell. The advantage of this set up is there is no need (as far as I can see) for a swirl pot set up to aviod fuel surge (which involves a lifter pump, additional small tank, and extra pipework). The fuel should keep the pump covered as the pump sits at the bottom of a high and narrow tank. Time will tell of course, and a track day will be the real test.

More fetling on the inlet manifold, I am currently chain drilling the portholes around the plastic gasket...In all honesty, I should have bought the flange from ebay, as one of the chaps on the locost forum makes them for reasonable prices. Said person has also supplied me with a blank air filter back plate that will be used to mount the pipercross PX500 air filter.

Made some progress on the wiring too...have now buzzed out two of the sub looms so I have all the connections written down. When doing the wiring, I like to be able to disconnect the various looms where possible, so currently loom 1 has the injectors, TPS, VCT, camshft position sensor. Loom 2 has the inlet manifold temp sensor, alternator, VR sensor. Both connect into the main loom that will go to the ecu.

On another note, the DVLA have let me down (or possibly the royal mail), the V5 never arrived for the Puma, so although I've now finished with it, I can't get rid of it. I've just sent off my V62 for a replacement logbook, and a V890 to apply for SORN.

Looks like pickup date is going to be the weekend of the 10/11th Nov 12....

Tuesday, 16 October 2012

Finished with the Donor Car.

I've now removed the loom from the Puma, this involved removing the dash. Once you know where the screws are it's easy!, but finding the screws ain't!.

At the mo, I'm not sure how much of it it I'll be able to make good use out of, but just automotive grade wires are worth keeping even if I use them to make my own loom. I did find an emergency cut off switch hiding in the passenger footwell, and that is something that can be used.


Steering column came out, then went back in as I need it to get rid of the car, and also, the fuel pump has been relieved of it's puma duties and will find a good home in the J15.

So, what next?....Well, I keep talking about the inlet manifold, and that's now well underway. Currently making up the two flanges that will be joined via the alloy tube. Also made an idle adjustment screw up.

Will try and get some pics of the inlet manifold posted soon. Meanwhile, I've strung all the bits I have up from the garage roof...and this is what it looks like so far :-)