Tuesday, 25 November 2014

Finished.

For some strange reason, the 25th Nov 2014 feels like a bigger milestone than passing the IVA. So, whats happened?......Well, the V5C form arrived today, and when I checked online the car had also been taxed. I had to check as the DVLA no longer issues tax discs, and there was no paperwork.

So, I picked the kit up on the 10th Nov 2012, and completed it on the 25th Nov 2014. Just over two yrs to build...not bad I suppose.

I've had a few moments recently where I've stood back and pondered what I would do differently if I was to build it again, and I guess its good to report that the answer was not a lot. I should have hacked off the steering lock gubbins and fitted an immobiliser (much neater), and also moved the key ignition to the side pod. Apart from that I think it's car I intended on building.

So, I should stop the blog?

Well, as anyone who has built a kit car knows, getting through the IVA is just a start, I'm now looking forward to some track days next year and trying to 'develop' the car into a quick track car.

Things I will ponder over the next year or so:
  • Anti Roll Bars
  • Side impact protection
  • New camshafts / remap
  • Brake balance adjustment
  • Suspension set up 
  • Aeropackage - front splitters / rear diffuser
Watch this space!


Sunday, 16 November 2014

Aeroscreen!

 I had a letter from the DVLA on saturday...Dear sir, you enclosed the incorrect amount for the first years tax payment...etc...etc....

Turns out, the first year you tax a car, it must be for a year...DOH!. Oh well, a few more weeks to wait then.

Meanwhile, a job I've been itching to do for a long long time......THE AEROSCREEN :-)

The standard Sylva offering for a windcreen is fairly tall and clear perspex. Point being it's tall enough that you need be able to actually look through it. It's a nice design though, just not exactly what I wanted.

I've always like the lip aeroscreens like you see on Caterhams, but the shape of the J15 does not lend itself to this sort of screen. The plan was to use some flat carbon, wrap it around the lip on the tub and secure it...Job done!..note quite. As there are two curves to contend with my so called simple job turned out to be actually quite difficult. To a point three attempts at a card template, and I gave up. What now?......A call to a fellow builder who has yet to fit his screen was the answer (thanks Chris). I took a template, and few hrs work on the weekend the J15 was sporting it's new aeroscreen. Still needs some further securing, but that can wait until the tub comes off.


Monday, 3 November 2014

Side duct number 1.

I promised I would keep everyone updated on this, so will try my hardest to keep taking photos as I go.

Moving on from the top vents in the engine bay, I've now installed the first of two NACA ducts in the side pod. After some measuring I realised I was able to squeeze in a 75mm duct. The main issue here was the fact that the side pod is not flat over the area of the duct. However, by strategically tightenin the rivets in an order so it pulled the fiberglass out evenly, I was 'JUST' able to get the duct flush to the body work.

The 75mm ducting came from ramair, and is good stuff...feels nice and strong.

The pipe work in the engine bay is pointing towards the air filter. No idea if it will make a real world difference, but as it was getting genuinly warm around this area, I can't see why not. By having a very slight

upwards angle on the duct, I was able to route the 75mm tube between chassis tubes. This holds it nicely. 

Sunday, 26 October 2014

More on the venting

I mentioned in my last blog update about my musings regarding engine cooling via some movement of fresh air. Since then, I've cut the 5 holes just above the throttle bodies and added some mesh. With the engine run up to temperature, you can really feel the warm air rising from this area, so it can only be a good thing with regards to inlet temperature.


I was also pondering the very rear of the car and thinking about some holes just above the exhaust silencer. While doing one of my 35 min staring sessions with a cuppa, I noticed some recesses in the back of the rear clam. I say noticed, I mean remembered....these were originally meant for rear reflectors, but as I changed my light arrangement from what Sylva intended (reflectors were built in to rear light cluster), the recesses were redundant.

For a laugh a I drilled them out and finished the edge off with a grommet. Yes, I know they won't do much in the way of cooling, but I think it looks rather good (better than a wasted recess anyway).


And finally, I have just noticed a nice little area just in front of the rear wheel arch, that would fit a small(ish) NACA duct just perfectly. With one of these installed each side and some nice 50mm ducting pointing up towards the throttle bodies, I think I could really make use of the top vent holes.


Saturday, 25 October 2014

Ride height revisisted

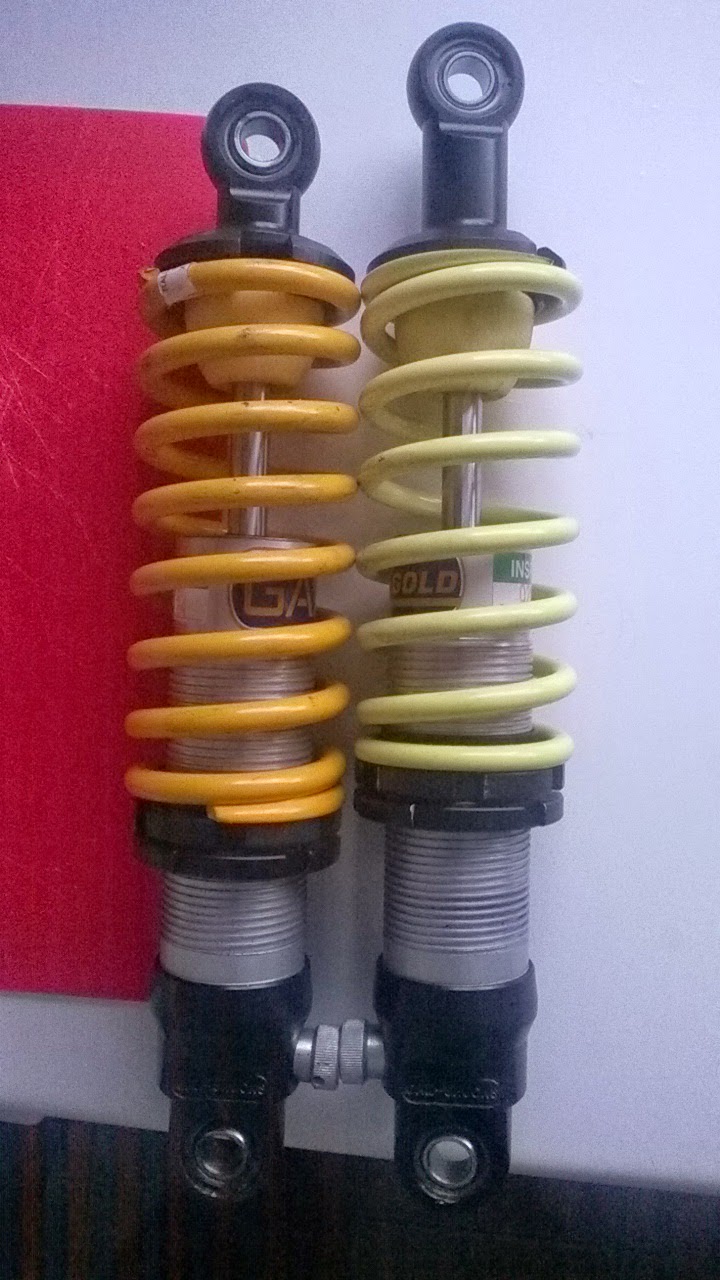
Having now done a few miles to and from IVA centre, it was clear that the car seemed way to stiff at the front end. The springs were 200lb, and having now seen the axle weights, my guess is 200lbs is too much for 200kgs. Something needed to be done!.

In addition, I used an extension bracket to add an inch of ride height to the car to allow the front lights to pass the 500mm height requirement for IVA. This actually proved useful in that gave me effectively a 13" shock which suits the car better with the 13" wheels.

The bracket used was a) heavy, and b). borrowed, so it needed to come off. The solution was potentially to sell the 12" shocks and buy some 13", but a quick call to Gaz and a new set of shock tops were on their way to me with almost an inch increase in length...perfect and cheap solution.

That solved the ride height, but to also soften the front end a little, softer springs were needed. I put these on while replacing the shock tops. I've only gone down to 175lbs as I still want the car to be more track focused than road compliant, so we will see how the 175's perform.

This pic shows the different length of the tops, and the different colour of a 175lb spring!.
Another hot subject is the engine bay cooling :-)

not much in the way of free air flow with these rear engined cars. Look at any production car that has an engine stuffed behind the seats, and you will notice fairly sizable vents in the side to channel air in to either the engine bay or to a radiator / oil cooler. The J15 as standard offers very little in the way of air flow. Yes there are two small vents just behind the drivers and passenger ear, but that's about it. This means the engine bay (which of course includes the entire exhaust system) stays pretty.....bloody....warm. not so good on track days, and as the induction is firmly located behind the rear bulkhead, not so good for power as the warm air is far less dense than nice crisp cool air from outside the car.

So, what to do....Well, I've started by introducing some 'escape holes' into the rear clam. The first to be drilled are just above the air filter. The next step is to try and get some more air forced in. My plan is to place two NACA ducts and some tubes pointing at the air filter from below. That's the plan, and while I'm waiting for the DVLA to make a dream come true (and send me my plates), now seems like a good time to do these sort of jobs.

Tuesday, 21 October 2014

IVAAAAAAAAAAAAAAAhhhhhhhhhhhhhh.....tis done m lud :-)

Goodness me, it's been a while since last post, but that's not to say nothing has been going on. To be honest, I can't remember all the various bits that I've done but it matters not......IVA is done and dusted.

It went through on the second attempt after a couple of surprising fails first time around. 1st was the wing mirrors. Basically they were not high enough to view the bottom dot on the IVA testers wall. Interestingly, other J15 builders had used the same mirrors and put them in the same position, but mine were 'way out'. Second on the list was the noise level. The pass mark was 100dBs and the J15 came out at 102dB. The issue here was not the exhaust noise but the fact that the engine was / is right next to the exhaust, so the meter picks up both exhaust and engine noise. Not good!.

Anyway enough of all that fail rubbish....retest took the best part of 20 mins, and with my new 4 inch mirror extensions, and 30 quids worth of sound deadening in the engine bay, she flew through. Job done. Since IVA, and by that I mean approx 36.324 mins after IVA, the look of the car has changed a little. The 'not so nice' mirrors have vanished (I think someone stole them), and as luck would have it, I had spare SPA central mirror, and some e-tech wing mirrors.

Also the steering wheel now looks 'different'...it's reduced down to 270mm, and a nice 90mm extension, and now sits perfectly where I want it with the added advantage that my knees don't hit it when driving. The experience is much more 'race car' like when sat in the drivers seat.

Other new additions are the two light covers, which I've been gagging to fit, but have resisted until through the IVA. These make a huge difference to the look of the car. The fitment of these is not great, as the mould of the front clam is not really designed to take them (i.e. there is no lip for them to sit in). But, nonetheless they certainly improve the look of the car in my opinion. I made the fixtures using some stainless washers bent over, then tapped a thread through them to take an M4 hex bolt.


And finally....back to the wheels. I've ditched the image split rims as I was never really quite happy with the size and fitment (mainly the offset). The previous rims had an offset which pushed them out of the arches, but not quite to the edge of the arch extensions. They were also 7 inch and although ok for a 185 tyre, was not optimum. So, I've reverted back to compomotive CXR's 6.5inch all round with an offset of ET01.

Well, that will do for now......I'm going to stop writing this and get on with what I should be doing, which is completing the DVLA forms!. Here hoping I get to drive it before the end of November.............2014 of course.


Monday, 1 September 2014

Self centering steering - an IVA requirement

The IVA manual states:

"When the vehicle is driven at speeds of over 10mph, there must be a degree of steering self centring evident"

This is a difficult one to get right without driving the car so I used a local private road to drive up and down to see if I could best gauge what was going on with the steering. The consensus on various forums seems to be a small amount of toe out and much increased front tyre pressure.

I tried this, and to be honest the car felt close on undrivable with the front end feeling like it made no contact with the road!. Back to the drawing board, tyres back to 18psi, and a tad of toe out seemed to do the trick. What was really interesting was the amount of difference just one turn of the track rod made on the feel of the car. In such a light car the geo set up can really change the entire feel of how it drives. I remember getting my old westfield set up by track developments just before a track day, and it was probably the single biggest improvement in performance terms that I made.

Plan is to get through IVA, then take car to the specialists for a suspension set up. Currently, the front end seems to stiff, possibly because the car is built as light as possible, but will do for now.


Wednesday, 13 August 2014

Engine bay protection

One of the (what I think) major issues with the rear of the J15 is the total lack of any protection of the engine bay from the rear wheels. This part of the build is left to the builder. I thought long and hard about this and came up with more seemingly unfeasible ideas that I care to remember. A chance glance over a rear engined 1960's lola at the recent Goodwood Festival of Speed gave me the inspiration I needed. That used a nicely crafted aluminium wheel arch that sat within the rear clam shell.

Clearly I couldn't dream of panel beating some Aluminium like they did in the 60's, so I opted to use the remainder of some plastic sheets I purchased in bulk some time ago.

A large piece was bolted to the inner arch, and the inner part bonded using sikaflex and some additional aluminium brackets for strength. End result should see the engine bay kept a little cleaner. You can also see some of the aluminium strips I've put over the exhaust cuts in the hope that it avoids the fiberglass catching fire!.


In other news.........One item that has been bugging me was the front indicators. I purchased them ages ago, and they were not E marked. For IVA, this is not a must, but no E marking means the IVA man must measure the brightness etc, so I simply opted to change the indicators for some that were E marked...Job done.
Also, because I've used 13inch wheels, the front ride height was not quite high enough for the lights to achieve their 50mm min height, this has now been taken care of via some brackets on the front shocks.
Finally...IVA....It's the 13th Aug 2014 now, and I applied two weeks ago. The money came out well over a week ago, but still no date. I was hoping for an aug date, but it's going to be sept I suspect...Oh well!.


Monday, 7 July 2014

The final push

It's the the 7th July and I've still not booked IVA....I think I'm ready but....but....but what!. I should just bloody book it and quit with the excuses.

A few general updates.

Rear view mirror, now installed, it needs to be high enough to get over the rear engine. This should do. I madeit from ally, and grafted on the puma mirror.

Also completed was some water proofing to the rear, in an attempt to shield some of the grime from the rear wheels.


Thursday, 12 June 2014

More on the vct system

Here are a few additional graphs showing the operation of the vct system in just an on/off mode.

  • Run 3 is with VVT on all the way
  • Run 4 is with VVT off all the way
  • Run 8 is with VVT on up to 5500 and off after, plus final tweaks on fuel and
    ignition.
What really stands out is the additional mid range that it fills, and clearly the cam is capable of making power high up the rev range (normally compramised with the mid and low down).

Will try and writ some more on this interesting subject when I get chance.

Saturday, 7 June 2014

Engine set up - Does VCT work?

Friday was a big day for the Sylva J15. It was time to get the engine tuned and ready for IVA.

I have used Northampton Motorsports many times in the past, and find them nothing but perfectly professional, pleasant to deal with and talk to and most importantly...bloody good at their job. You also know that the power you end with is real and not just beefed up pub fodder.

We kicked of at around 12:30pm, and the engine was all over the place. It would not idle, and there was something not quite right...we ended up tracing the issue down to a TPS sensor not allowing one of the butterflies to close, and the bleed screws leaking. Once sorted, we had a good tick over, and the car was ready for mapping.

Now, this was always going to be an interesting one. There has been many, many threads about the function of the variable valve timing system on the st170 and puma 1.7 engine. The system used by ford is continuously variable, but the Omex 600 in the J15 will only do on/off control. The question really is, will this work?.

The answer is yes, and it worked very well. Troy at NMS, did some power runs with the VCT fully on, and with it fully off.

  • With it on, the tick over and first 2000 rpm were compromised, but mid range looked good, with power trailing off beyond 6000rpm
  • With it off, tick over was fine, but the mid range was low, but top end power looked good with the engine puling right up to 7200rpm.
So, with these two plots overlayed, it was very clear where to turn the vct on, and where to turn it off again. This is done via the alt function in Omex, and also you can specify the throttle load, so if your are cruising gently, you can have the vct off.

Anyway, what was the result of all of this. Headline figures were a stonking 155bhp, but decent torque in the mid. You can see the plot shows the kick at 5800rpm, where VCT is disengaged. The curve is smooth, and the engine is bog standard apart from the Throttle bodies, and exhaust. so up from the 125 hp of the puma by 30bhp. Very pleased...I took the car for a sneaky drive down the industrial estate and it felt suitably fast. The next step was the emissions ...and with the addition of the CAT, it sailed through without any further alterations to the fuel map. All in all, a great day out :-)


Tuesday, 27 May 2014

Wheel arch protection and lighting

Not a massive amount done of late, but at least the rear lights are now completed and working. If you have been reading the blog, then you will no I opted not to use the lights that came with the kit for no other reason than I found the LED autolamps all in one units to be a good fit with style and ethos of the car I'm building. The LED units mean the drilling and mounting is easier as they sit on the fibreglass rather than poking through it, it also means the rear of the lights are less exposed to the inner wheel arch environment.

The fog, reverse and number plate lights are also LED, and suitably bright as can be seen in the pic below.
Other additions to J15 include some font inner arches to at least 'try' to keep the inevitable road grime away from the rest of the car...quite how effective this will be remains to be seen. I actually made them from the same material they use for most production cars. It's a plastic which is bendy enough to go around corners, lined with some rubber finishing strip. It's simply bolted into the panels that close of the end of the sills. More of this stuff needs to be strategically deployed around the car, but all in good time.

 Last but not least for May 2014.....what car would not look complete without a huge black dot on the side!. Number to be decided.....might put my age when I finished the car!
Next step...wire font lights and rolling road.


Tuesday, 6 May 2014

Stripes

The stripes are done!. So basically, this is how the car will look (apart from perspex headlight covers). I think the three way stripe looks good. The application was 'fairly' straight forward once I actually figured out that the soapy water method of fixing was indeed the best way to do it.

Of course, this should have been the last job, but it's yet another distraction from the lights wiring :-)